- Drag files into libraries
- Create folders
- Move and copy files
- Delete multiple files at one time
Tuesday, November 29, 2016
How to configure and to troubleshoot mapped network drives that connect to SharePoint Online sites in Office 365
After you configure a mapped network drive to connect to SharePoint Online sites, you can perform the following actions by using Windows Explorer:
Wednesday, November 23, 2016
Remove Interactive Services Detection A program running on this computer is trying to display a message
To disable Interactive Services Detection
- Click Start > Control Panel and then double-click Administrative Tools.
- Double-click Services.
- Scroll down and double-click Interactive Services Detection.
- On the General tab, change the Startup type to Manual or Disabled.
- Click OK and restart the computer.
windows IE shortcuts not working
Desktop Internet Shortcuts Not Working
Go to Tools > Internet Options under the Programs tab check that Default web browser is set to Internet Explorer. Go to Control Panel > Programs > Default Programs and select 'Associate a file type or protocol with a program'. Scroll down to the .url file extension and make sure the Current Default is Internet Browser and not Google Chrome. If not use the Change program... button to change it.
Tuesday, November 22, 2016
Internet Explorer Has Stopped Working Windows 10
[FIX] Internet Explorer Has Stopped Working
Microsoft has worked hard to enhance Internet Explorer (IE) and it now has almost all the features, that competing browsers are offering. Previously, we have seen how to reset IE, if you have more than one issues with this browser. Today, we’re back with another helpful yet important fix for IE. You might have faced this problem in your history that IE suddenly stopped working and closed itself. You can also say that IE was crashed, following is the error message you will receive in this case:
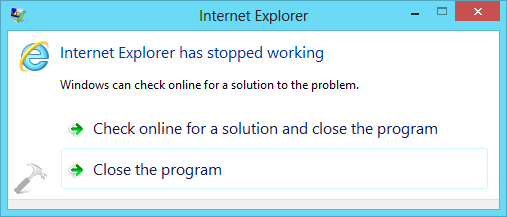
So when you receive this message, either IE closes itself, or you close it. You might have also used Task Manager, if IE is not responding at all – and you want to close it forcefully. Sometimes rebooting the system can also be helpful, while resetting IE by launching another instance could also be answer to this issue. But if you’re facing the problem, even after rebooting and installing latest Windows Updates, you can try following fixes:
FIX 1 : Internet Explorer Has Stopped Working
1. Press + Q and type troubleshooting and pick Troubleshooting from results.
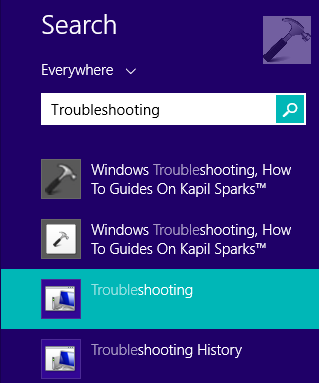
2. In the Troubleshooting window shown below, click View all link in the left pane.
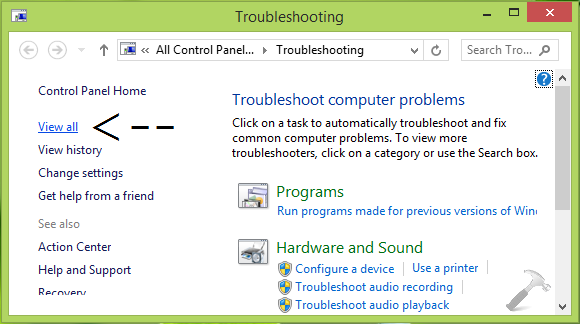
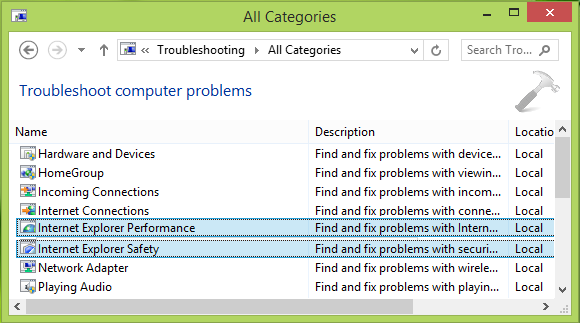
3. Next, in the All Categories window, run the Internet Explorer Performance and Internet Explorer Safety troubleshooters one by one by following on screen instructions.
Once you have completed troubleshooting, restart your computer and check with IE, the problem should be fixed now.
FIX 2 : Internet Explorer Has Stopped Working
1. Press + Q and type features and pick Turn Windows features on or off from results.
Microsoft has worked hard to enhance Internet Explorer (IE) and it now has almost all the features, that competing browsers are offering. Previously, we have seen how to reset IE, if you have more than one issues with this browser. Today, we’re back with another helpful yet important fix for IE. You might have faced this problem in your history that IE suddenly stopped working and closed itself. You can also say that IE was crashed, following is the error message you will receive in this case:
So when you receive this message, either IE closes itself, or you close it. You might have also used Task Manager, if IE is not responding at all – and you want to close it forcefully. Sometimes rebooting the system can also be helpful, while resetting IE by launching another instance could also be answer to this issue. But if you’re facing the problem, even after rebooting and installing latest Windows Updates, you can try following fixes:
FIX 1 : Internet Explorer Has Stopped Working
1. Press
+ Q and type troubleshooting and pick Troubleshooting from results.2. In the Troubleshooting window shown below, click View all link in the left pane.
3. Next, in the All Categories window, run the Internet Explorer Performance and Internet Explorer Safety troubleshooters one by one by following on screen instructions.
Once you have completed troubleshooting, restart your computer and check with IE, the problem should be fixed now.
FIX 2 : Internet Explorer Has Stopped Working
1. Press
+ Q and type features and pick Turn Windows features on or off from results.
Friday, November 18, 2016
How to change vpn shortcut in Windows 10 to open VPN connection instead of network & internet settings
To save your time, you might want to create a shortcut to connect to a VPN directly. Here is how it can be done.
- Right click the Desktop and select New - Shortcut.
- In the shortcut target box, type or copy-paste the following command:
rasphone -d "VPN connection name"
- Set the desired icon and name for your shortcut.
Once you do this, just click this shortcut to connect to a VPN directly. You can pin it anywhere you want.
Make a second shortcut to disconnect from the VPN with this command:
rasphone -h "VPN connection name"
Thursday, November 17, 2016
Adobe Acrobat 9 Standard has error code 148:3 and appears to be unregistered
How To Fix Adobe Error Code 148:3
The root cause of this problem is that the FLEXnet Licensing Service has been disabled, enabling this service should get rid of the Error Code 148:3. Here is how you can enable the FLEXnet Licensing Service on Windows XP, Windows 7 or Windows Vista.If you are looking for a software to manage services in Windows you can try out the Services Editor or Service Manager Plus.
Step 1: Press Start > Run and type in services.mscwithout the quotes and hit the Enter key. You can also use the Windows Key + R hotkey to launch the run box.
Step 2: In the services window, find the service “FLEXnet Licensing Service”. If the Startup Type is set to Manual, you just have to start the service and try opening the Adobe application again, you don’t need to follow the rest of the steps. However, you might want to change the Startup Type to “Automatic” so that you don’t have to do this every time. You can follow the rest of the steps if you want to change it to automatically start with Windows.
If the service Startup Type is “Disabled” you will have to enable it, to do that double-click on the service name to open the properties box.
Step 3: In the available Startup Type dropdown options select “Automatic” and click on the “Apply” button.
Step 4: Once the changes have been Applied, click on the “Start” button to start the service.
Once you are done, click on Ok and close the services manager. Try restarting the Adobe application and the licensing problem should no longer be an issue.
Thursday, September 8, 2016
Adding external email address to internal exchange distribution group
how to forward distribution group to outside email
1. Open EMC (Exchange Management Console)
2. Open the Recipient Configuration list
3. Click Mail Contact and add the external user as a mail contact
2. Open the Recipient Configuration list
3. Click Mail Contact and add the external user as a mail contact
Now, go to EMC again
>>Recipient Config
>>Distribution Group
>>> And add the mail contact to your distribution group.
>>Recipient Config
>>Distribution Group
>>> And add the mail contact to your distribution group.
Wednesday, August 31, 2016
Cannot create signature block in roaming profile
1.Open Windows (File) Explorer and type
%AppData% in the Address Bar
2.Navigate to ...\Microsoft\Signatures
3.Right click on the Signatures folder, select
Properties, Offline Files and click Sync Now
Once successfully synced you will be able to
create Signatures
Friday, August 26, 2016
Change Windows 8 to be more like Windows 7 - Disable Metro screen Windows 8
The first thing you'll want to do with your new Windows 8.1 machine is set it up to keep Metro out of your way with its new settings. Right-click the taskbar, click Properties and select the Navigation tab in the resulting screen. Here's where you can tame the majority of the annoying Metro features that pop up. You can disable hot corners, the app switcher bar, and most importantly, boot directly to the desktop.

Make files open in desktop apps and not Metro
By default your music, videos, pictures and PDF files open in Metro-style apps.To avoid this, you can go into settings and change file associations. I wrote this trick up in a previous article for Windows 8, and the process is the same for 8.1 too.

Get back the Start menu you know and love
Microsoft listened to users complaining about the lack of a Start button in Windows 8, sort of. There is a Start button, but it will take you to the new Start screen and you might prefer having the full menu like in previous versions. There's a couple of ways to go about getting it back. Either the free way, or spending US$5 for Start8. Personally, I prefer free, and recommend using Classic Shell. It's easy to use and provides a lot of customization features.

Make files open in desktop apps and not Metro
By default your music, videos, pictures and PDF files open in Metro-style apps.To avoid this, you can go into settings and change file associations. I wrote this trick up in a previous article for Windows 8, and the process is the same for 8.1 too.
Get back the Start menu you know and love
Microsoft listened to users complaining about the lack of a Start button in Windows 8, sort of. There is a Start button, but it will take you to the new Start screen and you might prefer having the full menu like in previous versions. There's a couple of ways to go about getting it back. Either the free way, or spending US$5 for Start8. Personally, I prefer free, and recommend using Classic Shell. It's easy to use and provides a lot of customization features.
Wednesday, August 24, 2016
How to change the Kaseya Maintenance Notification or Reboot pop-up
When users are prompted to restart their machines by Kaseya go here to change the configuration to allow the machine to reboot at a certain time so the user will not receive the notification.

Friday, July 29, 2016
Adobe troubleshooting
site for downloading adobe acrobat directly
ftp://ftp.adobe.com/pub/adobe/reader/win/AcrobatDC/1500720033/
https://helpx.adobe.com/acrobat/kb/troubleshoot-reader-installation-windows.html
ftp://ftp.adobe.com/pub/adobe/reader/win/AcrobatDC/1500720033/
https://helpx.adobe.com/acrobat/kb/troubleshoot-reader-installation-windows.html
Monday, July 25, 2016
Internal Exchange server notes
When there is an Internal Exchange server, Outlook uses an Active
Directory assigned number, it does not use the SMTP address.
Monday, July 18, 2016
Thursday, May 19, 2016
Forward a gmail to a gmail in google admin control panel
Google made it a bit difficult to forward mail from one google mail address to another
here is my short guide and notes from working with the admin.google.com site:
1.go to admin.google.com and enter your admin credentials
2.on the home screen click on apps -- google apps -- then gmail
3.click on advanced settings at the bottom
4.click the default routing tab to the right on the top
5.click on ADD SETTING and a pop up box will open
6.in step 1 recipient put the mailbox where the original receiver is
7.in step 2 check the box that says also deliver to add more recipients
8.now click the ADD button and type the person who gets mail forwarded here
save and done!
Wednesday, May 11, 2016
Disable Metro style Windows 8 Internet Explorer with address bar located on the bottom of the screen
1. Open IE10 Desktop.
2. Click on the Tools "cog" (top-right) then select Internet options.
3. Click on Programs tab.
4. Tick the box labeled Open Internet Explorer tiles on the desktop.
5. In the dropdown menu above labelled Choose how you open links. select Always in Internet Explorer on the desktop.
6. Click OK.
PDF's open Save As prompt instead of opening in Google Chrome
In the Chrome address bar, type chrome://plugins and make sure that PDF viewing is enabled
now you should be able to open PDF's within the browser instead of saving them.
Monday, May 9, 2016
Forward email you receive from a specific email address to another email address Outlook 2010
Automatically Forward Email in Outlook 2010
1. In Outlook 2010, from the File menu, select Info/Account information, then click on Rules
and Alerts. From the E-mail Rules tab, choose New Rule…
2. Under “Start from a blank rule”, select Check messages when they arrive and click Next.
3. If you wish to only forward certain messages, you can select conditions for certain messages
to be forwarded. If you want all your messages to be forwarded, leave everything unchecked.
You will get a message “This rule will be applied to every message you receive. Is this
correct?” Select Yes.
4. Check “forward it to people or distribution list”. In the lower pane, click people or
distribution list.
5. This will open the Rule Address window with the address book. Search for the email
address(es) for which you would like to forward your e-mail. You can also just type the full
email addresses in the To field. Click OK then Next when done.
6. The box to setup exceptions appears. Select any exceptions you would like to apply to this rule
and click Next. Most users leave this blank.
7. Under “Specify a name for this rule”, give your rule a name. Check the box for “Turn on
this rule” if you would like Outlook to start forwarding messages now. Check “Run this rule
now on messages already” in “Inbox” (rarely used) if you would like Outlook to forward
everything that is already in your Inbox . Click Finish and you’re done.
Friday, May 6, 2016
Permanently disable Windows Defender in Windows 10
- Run gpedit.msc.
- Navigate to Computer Configuration > Administrative Templates > Windows Components > Windows Defender.
- Double click on "Turn off Windows Defender"
- Select "Enabled" > Apply > OK.
- Close Group Policy Editor.
Monday, April 4, 2016
Windows updates failed, Want to delete all failed update files in history location
Method 1: Check the Windows Update log file for the errors
a. Click on start; in the start search type %Windir%\WindowsUpdate.log and hit Enter.
b. Open the log file.
c. Scroll down almost towards the bottom of the page and you’ll find the error of those updates that failed to install.
Method 2: Steps to erase Windows Update history
Note:Erasing the windows update history will just remove the entries of the updates and not really the updates itself.
a. Go to menu Start> All Programs> Accessories. Right click on the "command prompt" and select "Run as Administrator".
b. Copy/paste the below command:
c. net stop wuauserv
d. And select OK.
e. Wait until confirmation that the service is stopped.
f. To delete the file, copy the following command in the command prompt:
g. del %systemroot%\SoftwareDistribution\DataStore\Logs\edb.log
h. You can also delete it manually by going to the location in windows explorer.
i. you can restart the service with this command:
j. net start wuauserv
Method 3: Install the updates by putting the computer into a clean boot
A clean boot helps in eliminating software conflicts. Once the update history is erased, try to install the updates by putting the computer into a clean boot state.
Friday, March 25, 2016
Thursday, March 24, 2016
How can I stop synchronization logs from being emailed to my Outlook? I am receiving hundreds of emails titled "Synchronization Log:"
Turn on or off Cached Exchange Mode
Cached Exchange Mode saves a copy of your mailbox on your computer which provides quick access to your data and is frequently updated with the server that runs Microsoft Exchange.
NOTE: A Microsoft Exchange Server account is required.
More information about Cached Exchange Mode
Cached Exchange Mode enables a better experience when you use an Exchange account. In this mode, a copy of your mailbox is saved on your computer. This copy provides quick access to your data, and it is frequently updated with the server that runs Microsoft Exchange.
If you are unable to turn on Cached Exchange Mode, one or more of the following might apply:
-
An Exchange account doesn't exist in your Microsoft Outlook profile This feature requires that your Outlook profile contain an Exchange account.
-
Your Exchange server administrator has disabled this functionality Exchange administrators can disable this feature in Outlook. For more information, contact your Exchange administrator.
-
Microsoft Terminal Services is installed Cached Exchange Mode is not available on computers that run Windows Server when Microsoft Terminal Services is installed.
Cached Exchange Mode saves a copy of your mailbox on your computer which provides quick access to your data and is frequently updated with the server that runs Microsoft Exchange.
NOTE: A Microsoft Exchange Server account is required.
More information about Cached Exchange Mode
Cached Exchange Mode enables a better experience when you use an Exchange account. In this mode, a copy of your mailbox is saved on your computer. This copy provides quick access to your data, and it is frequently updated with the server that runs Microsoft Exchange.
If you are unable to turn on Cached Exchange Mode, one or more of the following might apply:
- An Exchange account doesn't exist in your Microsoft Outlook profile This feature requires that your Outlook profile contain an Exchange account.
- Your Exchange server administrator has disabled this functionality Exchange administrators can disable this feature in Outlook. For more information, contact your Exchange administrator.
- Microsoft Terminal Services is installed Cached Exchange Mode is not available on computers that run Windows Server when Microsoft Terminal Services is installed.
Turn on or off Cached Exchange Mode
-
Click the File tab.
-
Click Account Settings, and then click Account Settings.

-
On the E-mail tab, click the Exchange account, and then click Change.
-
Under Microsoft Exchange server, select or clear the Use Cached Exchange Mode check box.

-
Exit and then restart Microsoft Outlook 2010.
When you are using Cached Exchange Mode, an e-mail message may remain in the Outbox for up to one minute until the next synchronization with the server that runs Exchange occurs. If you want to send the message immediately, do the following:
-
On the Send/Receive tab, in the Send & Receive group, click Send All.

- Click the File tab.
- Click Account Settings, and then click Account Settings.
- On the E-mail tab, click the Exchange account, and then click Change.
- Under Microsoft Exchange server, select or clear the Use Cached Exchange Mode check box.
- Exit and then restart Microsoft Outlook 2010.
When you are using Cached Exchange Mode, an e-mail message may remain in the Outbox for up to one minute until the next synchronization with the server that runs Exchange occurs. If you want to send the message immediately, do the following:
- On the Send/Receive tab, in the Send & Receive group, click Send All.
Manually configure message download preferences
Cached Exchange Mode can automatically optimize data transmissions for the connection speed to the server that runs Exchange. However, you can manually change the download preferences.
-
On the Send/Receive tab, in the Preferences group, click Download Preferences.

-
Click one of the following options:
-
Download Full Items This is the default setting. All messages and attachments are downloaded.
-
Download Headers and Then Full Items After message headers are downloaded, downloading of message bodies and attachments begins. When downloading a large amount of items, this setting is useful so you can see message headers quickly and then choose a message to open without first waiting for all messages to be downloaded in their entirety.
-
Download Headers No message bodies or attachments are downloaded. This reduces the data transfer amount and connection time. When you open an item, the full item is then downloaded from the mail server.
-
On Slow Connections Download Headers Only When a slow connection is detected, message bodies and attachments are not downloaded. If this option is not selected, the three previous choices determine what is downloaded regardless of the connection speed.
In addition to Exchange folders, Cached Exchange Mode works with shared folders. Examples of shared folders include another person's Exchange folders when you are using Delegate Access, or SharePoint folders. To turn on or off shared folder support when you are using Cached Exchange Mode, do the following:
-
Click the File tab.
-
Click Account Settings, and then click Account Settings.
-
On the E-mail tab, click the Exchange account, and then click Change.
-
Click More Settings.
-
On the Advanced tab, under Cached Exchange Mode Settings, select the check boxes for the options you want.
Cached Exchange Mode can automatically optimize data transmissions for the connection speed to the server that runs Exchange. However, you can manually change the download preferences.
- On the Send/Receive tab, in the Preferences group, click Download Preferences.
- Click one of the following options:
- Download Full Items This is the default setting. All messages and attachments are downloaded.
- Download Headers and Then Full Items After message headers are downloaded, downloading of message bodies and attachments begins. When downloading a large amount of items, this setting is useful so you can see message headers quickly and then choose a message to open without first waiting for all messages to be downloaded in their entirety.
- Download Headers No message bodies or attachments are downloaded. This reduces the data transfer amount and connection time. When you open an item, the full item is then downloaded from the mail server.
- On Slow Connections Download Headers Only When a slow connection is detected, message bodies and attachments are not downloaded. If this option is not selected, the three previous choices determine what is downloaded regardless of the connection speed.
In addition to Exchange folders, Cached Exchange Mode works with shared folders. Examples of shared folders include another person's Exchange folders when you are using Delegate Access, or SharePoint folders. To turn on or off shared folder support when you are using Cached Exchange Mode, do the following:
- Click the File tab.
- Click Account Settings, and then click Account Settings.
- On the E-mail tab, click the Exchange account, and then click Change.
- Click More Settings.
- On the Advanced tab, under Cached Exchange Mode Settings, select the check boxes for the options you want.
Tuesday, March 1, 2016
How to set-up AppRiver email on an iphone
How to Configure the iPhone/iPad/iTouch for Exchange w/AppRiver
1. Turn the iPhone ON and tap Settings on the home screen.
2. Tap Mail, Contacts, Calendars.
3. Tap Add Account.
4. Tap Microsoft Exchange.
5. Enter the following:
E-mail: The user's e-mail address
User Name: The user's e-mail address
Password: The user's mail password
Domain name: exg7.exghost.com
Account description: User's preference
6. The setup will fail, and then prompt the user to enter a server name, which is exg7.exghost.com
7. Once the device connects to the server, it will prompt the user for what items they want to synchronize (e-mail, contacts, and calendar). Once they make that selection, tap Save.
Monday, February 29, 2016
Remove Kaseya Agent from Mac
To uninstall or remove the Kaseya remote support agent from a Mac you have to install the Kaseya Removal tool http://dl.kaseya.com/download/support/agents/macosx/KaseyaUninstall.pkg.zip
Thursday, January 28, 2016
useful command prompt lines for Internet Explorer troubleshooting
Reset IE's default settings
RunDll32.exe InetCpl.cpl,ResetIEtoDefaults
Open Internet Options
inetcpl.cpl
RunDll32.exe InetCpl.cpl,ResetIEtoDefaults
Open Internet Options
inetcpl.cpl
Wednesday, January 20, 2016
Sonicwall VPN client set-up error - Failed to validate the SSLVPN server
Problem: Before I have to call Sonicwall support I was hoping someone here has run into this. I have 2 Sonicwall NSA 2400 in HA. Both running ROM: 5.0.3.3 Firmware: 5.9.0.7-17o. When I try and connect to the SSL VPN on any windows 8.1 machine I get
Solution: Change: SSLVPN > Server Settings > Check Enable Server Cipher Preference - Change to 3DES or AES256_SHA1
"Failed to validate the SSLVPN server, the SSL VPN configuration may be invalid or the server may be running on an old or incompatible firmware!"
According to everything I've read, all of it is up to date and compatible with 8.1. Windows 7 and XP (I know, they're being retired) connect without issue. My android and iPad connect fine. I've uninstallded, re-installed, etc... I really don't want to have to call Sonicwall. Thanks in advance.
Solution: Change: SSLVPN > Server Settings > Check Enable Server Cipher Preference - Change to 3DES or AES256_SHA1
Subscribe to:
Comments (Atom)